Amazon Web Services (AWS)
Overview
AWS offers on-demand servers that can host the Linux-server version of xRC-Sim. This service has several great advantages:
- On-Demand servers - pay only for the time you need it.
- Outstanding internet performance - Coast-to-Coast low latency and very consistent ping-times
This results in very smooth performance. Most of the jitter is due to the network after the packets leave Amazon's back plane. With Amazon's internet pipeline, playing with people from across the country is possible. Being closer is still better then being far away from the server location, but it is possible for East coast player to have a game with West coast with only minor dis-advantage.
Did I mention it's free (well, kinda...)? Amazon offers 1-year for free for their "t2-micro" or "t3-micro" server (depends on region selected). It just so happens xRC-Sim with 6-players on Infinite Recharge will use 80% of the CPU power of a "t2-micro", making the free version playable. Paid versions are not that expensive either.
There are a lot of AWS server options and the pricing matrix is difficult to decode, so below is the recommended options you can use with xRC-Sim. The fundamental concept for T2/T3 servers is as follows:
- You pay for a server per minute running
- Each plan gives you a different "baseline", or CPU loading, that it accrues. For example, a "micro" sized server allows you to use 10% of the CPU power without additional charge
- If you are running the server but not using all the baseline CPU power, then you save it for later. You can store up to 24-hours of baseline power
- When you need more peak power, you use up your storage. If you use it all up, and there aren't enough hours in the 24-hour period to accrue more to make up for this, then you pay over-charges. These over-charges can be more expensive then the baseline rate, or less. Depends on your conditions.
The following table shows the recommended configurations and their cost while running Fully Loaded (defined as Infinite Recharge with 6-players and 1 spectator, Update time = 25ms):
| Server | Cost/24 Hours | Fully-Loaded Playtime/Day (using baseline credits) |
Effective Cost / Playable Hour | Over-Charge for extra hours | DATA Cost: Free Data | Additional Data Cost/h (<2GB/Hour) |
Total Approx Cost / h (Fully Loaded) |
| T2.micro | FREE or 28c | 2.75h | FREE or 10.2c | 4.4c | 2.6 h/Month | <18c | 18c to 22c |
| T3.micro | FREE* or 25c | 3.9h | FREE* or 6.4c | 6.2c | 2.6 h/Month | <18c | 18c to 24c |
| c5a.large | $1.85 | 100% | 7.7c | None | 2.6 h/Month | <18c | 25.7c |
Note 1: These are On-Demand prices with no pre-payment or commitments. Free tier offers 750 hours a month free - this means either one machine running full time, or multiple-machines running proportionally shorter. Free period lasts 1 year from account inception. T3.micro free tier depends on region. Data cost is for outgoing data only (uploading your files to server doesn't cost anything).
Note 2: This data cost is based on 25ms update time (approx 40 updates per second). Having a faster update rate or more spectators will increase costs.
Notice that data costs more then the CPU when fully loaded. This high data usage is only during the actual match, any down-time spent moving players in/out, coordinating, etc... don't fully utilize the bandwidth. It is unlikely you will ever reach that full cost, and typically in a tournament setting expect to pay 50% to 75% of that. The "Free" tier computers are great if there is a lot of down-time, for example, when you want to have a persistent server up and it won't get a lot of total play-time. You will still pay for the extra data, but the actual computer itself can be free. During peak times (e.g. a long tournament), data pricing and over-charges dominate and paying for a premium server may make sense.
All-in-all, the T2.micro (when free) offers the lowest price: It allows for 2.75h of free fully-loaded playtime and each additional fully-loaded hour costs 4.4c for the computer, plus any data usage required to run the game. If you don't plan to use many extra hours, then T3.micro (when free) offers more free hours, although the overage is more expensive. The only concern with T2.micro is that fully loaded, the game utilizes ~85% of the CPU power, which doesn't leave a lot of buffer.
If you are going to pay for the server or want more reliable performance, I recommend the c5a.large. You get 2 full processors allocated the entire time (still shared with others) and as such are less likely to get intermittent "jittery" performance due to other shared resources not allowing you to burst. Additionally, you could run 2 servers on it, albeit we haven't tested how smooth it will be if both servers are fully loaded.
AWS Account Setup
In order to setup a AWS account, you will need a credit card for over-charges.
Here are some instructions to follow:
https://aws.amazon.com/premiumsupport/knowledge-center/create-and-activate-aws-account/
Starting a AWS Server
Once inside the the account, you can launch an instance by going here.
Notice this will start in the "Ohio" region, if you want to change the region click on the top bar where it says "Ohio":
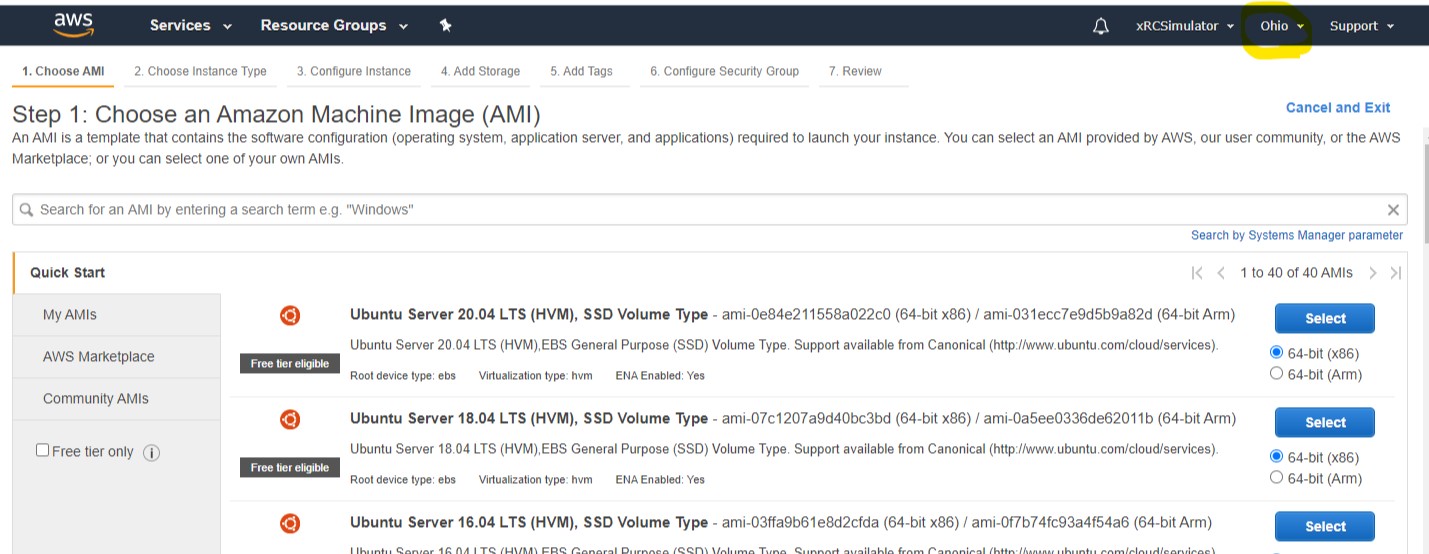
Select the following from the menu system:
- Chose the newest Ubuntu 64-bit (x86). In the image above it's the first choice, your selection may differ.
- On the next page chose the type of server you want. t2.micro is listed as "Free tier eligible", but t3.micro is also free although it is not flagged as such. Click on "Next".
- On the "Configure Instance Details" you can leave everything to default. The T2/T3 unlimited is worth considering: if you click it it may create over-charges, but it will also let you go negative in credits and recover them in the 24-hour window. If de-selected, the game will stop or become unplayable if you deplete your credits, but will guarantee no charges.
- "Add Storage" leave as default.
- "Add Tags" leave as default.
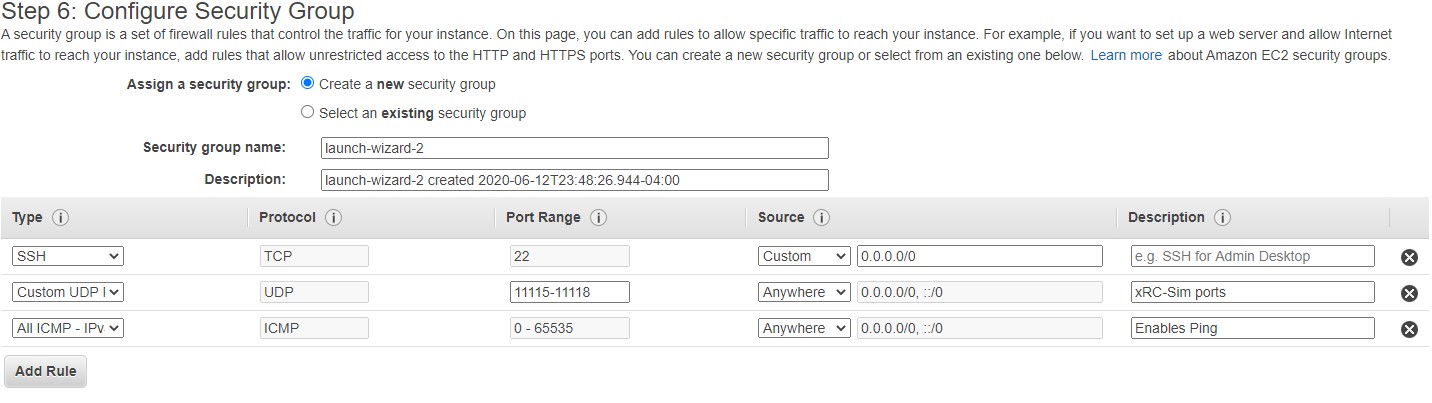
- Security group will need to be set up for your first server. Future servers can re-use these policies. By default you should have SSH port setup so you can log-in remotely. Next, we need to add UDP for the game and All ICMP - IPv4 to allow pings
- Review and launch the service.
- When asks to "Select an existing key pair", create a new pair, give it a name and download the key-pair:
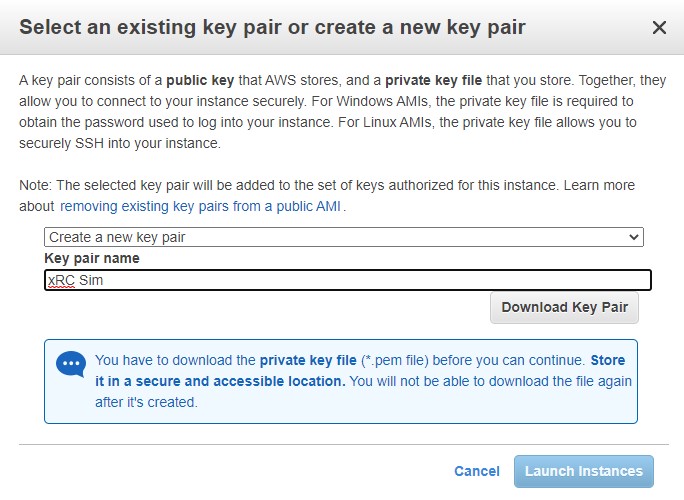
You now have the server running and you downloaded the secret key-pair allowing you to connect to your server remotely. Next, you will want to connect to your server. Use the following guide of how to do that:
https://glassonionblog.wordpress.com/2012/01/29/connect-to-an-ec2-instance-with-putty-winscp/
NOTE: Your login user-name is "ubuntu" for these servers. In Putty, your host-id can include the username:
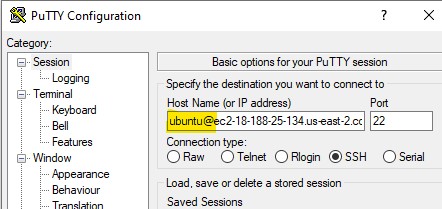
The long convoluted name of the server can be copied from the dashboard:

Installing and Running xRC-Sim
Now that you can connect to and upload file to your server, do the following steps:
- Upload the Linux-Server.zip version of the game (using WinSCP if on windows)
- Using the Putty terminal (if in windows), install unzip: sudo apt install unzip
- Unzip the file: unzip xRCSim-v4.7.zip
- Configure the script by editing the runserver.sh file. I use the vi editor, but you might want to use nano or pico
- For the first time, you want to run the script by typing: bash ./runscript.sh. After that you can run it by just typing ./runscript.sh
Congratulations! The server should be running and accessible from the outside world.